Showing posts with label spray paint. Show all posts

Thursday, June 4, 2015

What's Going On

There are lots of things that go on in my life that don't get posted to RGR. I am an avid Instagram and Twitter user but I know some of you don't utilize those platforms. I thought I would start a little (occasional) series. I'll be highlighting those things that don't make it to the blog and previewing some future content. Because my love of for 60's and 70's R and B runs deep, I thought I would call on Marvin for this one. Sadly Marvin is no longer with us.


May was really busy and June and July promise to be even busier. You know you're in for a crazy summer with the majority of your weekends in May, June and July are booked before the end of March. I'm trying to squeeze in some home repairs, Stella and Dot trunk shows, and relaxation into my schedule.

Falling in love with Korean skin care products, post soon.

I'm trying out some fun new products via Influenster, post soon.

Small changes to our bedroom. A close up of our new comforter.

The Stella & Dot Fall Preview collection launches today!  www.stelladot.com/debv to order

Old chairs to rehab...

A little spray paint and now they are like new and ready for summer!

Fun with friends (and {msL}) and some fantastic new music last weekend.
If you're on Instagram (@realgirlrunway) or Twitter (@realgirlrunway), I'd love for your to follow me. Be sure to say hi and I will return the favor.


Pin It!

Thursday, January 17, 2013

DIY - Some of my favorites

I've spent the last few days getting things ready for our big wedding DIY weekend. I realized late last night that I didn't have a blog post for today.  Instead of not posting, I decided to give you all a post showing you some of my personal favorite DIY projects. 


Chain Detail Jacket - I love that just some craft store chain can elevate a jacket.  It was one of my early DIY projects and one of my favorites. I wear this jacket often.

Duck Tape Clutch - The reason I love this DIY is because you can use any color or style of duct tape you like.  You can make it your own.

Rock Lyric Tee - Inexpensive t-shirt, stick on letters, spray paint, and your favorite rock lyric are all you need to create this t-shirt. It's a fun and cool addition to your casual wardrobe.

Silver Oxfords - If you have a pair of old oxfords or can grab a pair at the thrift store, you can create these shoes in just a few hours. I used silver but you could use any color you like. Neon pink would be fantastic.

Minty Shades - Nail polish as paint? Yes! The mint green polish elevated these shades from boring to wow and this entire project was finished in about an hour.

Safety Pin Necklace - I love DIY because I can create a designer style necklace for $900 less than the original.  Maybe it's my life long love of punk rock looks but safety pins as jewelry are fantastic.

Metallic Skull - Home decor DIYs are the best.  I get bored easily and love changing up the accents in our home.  A $1 plastic Halloween skull becomes a cool home accent with a little spray paint.

I hope these favorites of mine inspire you to get creative.  I'd love to hear about any projects you create.


Pin It!

Monday, October 22, 2012

DIY - Console Table Redo

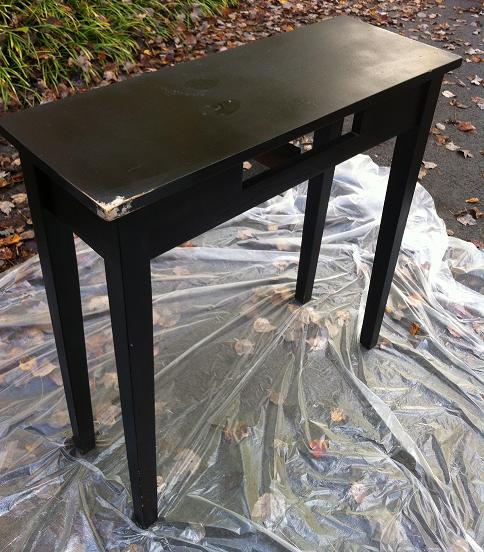
This little console table was one of my very first new furniture purchases, ever.  Originally the table was a plain waxed pine with a matching mirror.  The mirror is now hanging in our guest bath and it's painted gold.  Several years ago, I painted the table black (as you see below) and replaced the wood drawer pull with a nickel one.  This weekend I decided it needed some new life and a little fresh paint.


First, I patched a dented corner with a little wood putty.  Then I sanded it and wiped down the whole table.  I've always wanted a mirrored piece of furniture, like these.

mirrored furniture


I didn't have any illusions that silver paint would give me a mirror like finish. I just wanted a similar look. I snagged two cans of Metallic Silver Krylon paint at our local hardware store.  Since I was covering black paint, I knew it would take more than one coat and possibly more than one can of paint. I also decided at the last minute to paint the drawer pull black.  The nickel finish wouldn't look good with my silver console and I didn't have another drawer pull. 


A few hours of painting, drying, two cans of paint and I feel like I have a new table. If I decide later that I want the black table back, it's easy to change. Who knows maybe it will be another color in the future, red maybe?

Have you ever used some spray paint to give a piece of furniture new life?


Pin It!

Monday, October 15, 2012

Instagram Monday with lots of DIY

I'm finally feeling better and over the weekend I did a few projects.  I did more sleeping and resting than anything so my plan to write a few blog posts didn't happen.  I thought I'd share a few of my photos from the past week or so.  I took these via Instagram.  It's easy to tell that I love the Instagram app.  If you're on Instagram, make sure to follow me (@realgirlrunway).  If you're not on Instagram, you can check out my latest pictures on Followgram or on the widget that's on the left side of my blog.


From top to bottom...

  • Pretty DIY decorations from my cousin's recent outdoor wedding. It was a beautiful ceremony and a wonderful time with my family.
  • My sweet puppy Anita. She is a very active dog, so when she stops for a moment and looks so zen, I have to capture it.
  • A beautiful lace options for my wedding dress.  It's crazy that fabric is so expensive. This lace costs $129 per yard!
  • Glitter skull DIY for our Halloween table decor. Made using plastic skulls from an after Halloween sale (last year) and left over glitter spray from this DIY.
  • Chandelier for our wedding decor. I wanted a black chandelier to hang over the dance floor.  Thousands for a black crystal chandelier wasn't practical or in the budget.  I'm making my own using a brass chandelier I bough via craig's list.  This is step one, painting.  Bling will come next.
Hope you are all having a great Monday.  I'll get back to regular posting this week.


Pin It!

Thursday, August 23, 2012

Inspiration - Silver Accents

My love for all things silver is pretty obvious.  I've done many posts with silver jewelry.  I always gravitate toward silver over gold. I just love the way it sparkles.  Here are just a few of my silver loves and inspirations.


Thrifted Watch Band Turned Bracelet

DIY Upcycled Tray, Spray Painted Silver

My Stella & Dot Alexandria Necklace


DIY Silver Skull

ASOS Paris Metallic Pointed Heels only $20.44!

Coolest DIY Silver Leaf lampshade from Design Sponge

DIY Silver Leaf Chest from Little Green Notebook

ASOS Spike Stretch Bracelet


My thrifted tray and after Halloween sale, skull became great home accents.  A thrifted watch band has become one of my favorite bracelets. I'm in love with my Stella & Dot Alexandria necklace (c/o). It's in regular rotation and I get compliments every time I wear it. A pair of silver pumps are on my list and these are on sale for only $20.44 at ASOS!  I love simple DIY projects and this black and silver shade just that. Some silver leaf will transform a blah black shade. There is a brown buffet sitting in our dining that I bought via work list serve many years ago.  I've been debating about what to do with it and couldn't decide. Then I spied this silver leaf DIY on Pinterest and I knew I'd found the solution. DIY here I come! I can't resist a spiked bracelet. The gunmetal version is one of my favorites and I definitely need to snatch up the silver one too.

What's your favorite accent color?


Pin It!

Thursday, July 26, 2012

Inspired By Pinterest - Saw Pinned Conquered Link Up

I love a good DIY and get inspiration from all sorts of places. Last week I got an email from Amy of At the Pink of Perfection and fellow CapFABB member. She said she was going to be hosting a new link up for folks who make things from Pinterest called Saw Pinned Conquered. Well you know I had to join in.  This week I thought I'd show a recap of the items inspired by Pinterest, that I have created. To be honest, I didn't have time for a new project this week. In the coming weeks, I'll show you new items during the link up.


Minty Shades - Made using nail polish

A Gold Cup/Derby Hat - Inspired by British fascinators from Pinterest

Glitter Mani
Mercury Glass Candle Holders for Our Wedding - Using spray paint and thrift store glass

Metallic Skull - dupe for a $349 skull

I'm constantly finding new items to create and fun ideas on Pinterest. Pinning is addictive and my idea wish list far outweighs the items I've created.  I'm sure I'll be making more soon.  Be sure to check out the items that Amy and the other ladies have created on At the Pink of Perfection.


Pin It!

Wednesday, June 13, 2012

DIY - Metallic Skull

Oh Pinterest, what did I ever do before you came along?  About two weeks ago I pinned a brass skull to my DIY Pinterest board.  I love skulls to wear, for decoration, in photos, and on and on.  I just love them.  When I spied the brass skull I just knew it would be my next DIY.  As luck would have it, I bought a bunch of plastic skulls from Target after Halloween last year. I wanted the skull to be silver instead of brass.  So I grabbed one plastic skull and the can of Krylon Chrome spray paint and went to work. 

Inspiration - HomeMint Brass Skull $349.99
At $349.99 I would not be buying this skull.  It looks amazing, but not for that price.  I knew I could get a similar look with my plastic skull and a little spray paint. Check out all the details after the jump.


Pin It!

Friday, May 25, 2012

Frugal Fashion Friday - DIY: Cap Toe Flats

I just knew my obsession with cap toe shoes would lead to a DIY or maybe two. Sitting in my closet and on their last heel tap were a pair of gun metal flats. They were destined for the trash but I decided to try a little DIY love and give them a second life. Some spray paint would do the trick.


I started by collecting supplies.

SUPPLIES

Shoes
Pink Neon Spray Paint
Clear Glaze
Tape
Alcohol and cotton pads

I measured the toes of the shoes and taped them off. Then I taped off the soles in the front and the full shoe to avoid any paint spatter.


I cleaned the toe areas with alcohol. I used plain rubbing alcohol and allowed them to dry. This isn't mandatory but I think it helps the paint adhere better.


Then I sprayed multiple thin coats on the shoes until I achieved the color I wanted. I allowed the shoes to dry completely between each coat.


Then I gave each shoe a single coat of Krylon Clear Glaze. This protects the shoes and gives the toe a shiny finish.


I'm happy with the results. A Goodwill trip is on tap for this weekend. I'm sure there is another pair coming soon.

Happy Holiday Weekend
Real Girls!


Pin It!

Monday, March 26, 2012

DIY - Rock Graphic Tee

There are lots of great rock tees available but I'm always looking for the ones that speak to me personally. What if you could take your favorite lyric and turn it into a one of a kind shirt?  All you need are just four simple supplies and a song lyric you love.

Just a few simple supplies were needed.

SUPPLIES
t-shirt.                      $7
spray paint               $4 already owned (from my neon jewelry DIY)
stick on letters          $3 already owned       .
newspaper               ______________
                                $7 (not counting the items I already owned)            


I chose a few lines from a song I love and one I could turn into a great design. The line is from "Crash Into Me" by Dave Matthews Band. "Sweet like candy to my soul. Sweet you rock and Sweet you roll.". Because sweet comes before each line I could create a design with that single word.


I stretched the shirt over the newspaper. Then applied the stick on letters. I didn't worry about them being straight and even. Imperfection would add to the cool rock vibe. 


Then I sprayed the paint across the letters in a swash. I wanted it to look accidental.


I let the paint dry completely. Then I removed the letters. The best part of this DIY is that it is completely customizable. Choose any song lyric, t-shirt, color of spray paint, and letter style to make it your own.


Pin It!

Tuesday, March 20, 2012

DIY - Glitter Boots like Giuseppe Zanotti

Well it appears to be glitter week here on RGR and that was totally unintentional.  A little while ago I did a post on my winter DIY inspirations.  I've been working on all sorts of projects and I've just finished up my glitter boots. I have terrible ADD when it comes to projects.  The boots took a little longer than I expected so I've done a little at a time. I was inspired by these $625 Giuseppe Zanotti boots.

Giuseppe Zanotti Glitter Boots $625

My original idea was just to use Krylon Glitter Blast Glitter Spray.  I loved the finish but I wanted them to look just like the Giuseppe Zanotti's. It wasn't quite the chunky glitter look that I wanted to achieve and I ended up adding loose glitter. The Glitter Blast was a great base for the chunky glitter.  I didn't have to mix two types of glitter, like I've seen other people do. The boots I purchased were tan.  I painted the boots black first. I painted the heels and soles solid black.  I sprayed a thin coat of black on the rest of the boot.

Black Paint on Boots, Heels and Sole Edges

After Spraying with Glitter Blast, I Started Adding Chunky Glitter

I continued added glitter until the boot was covered. Then I sprayed with several coats of Krylon Triple Thick Crystal Clear Glaze


Finished Boots!


SUPPLIES
Tan Boots                                             $17 (Target)
Black Spray Paint                                 already owned
Krylon Glitter Blast Glitter Spray          already owned from Holiday projects
Krylon Spray Adhesive                        $4 (with coupon from Michaels)
Krylon Triple Thick Glaze                    already owned from Holiday projects
Glitter (Paillette style)                            $3 (Michaels)
Painters tape                                         already owned
newspaper
__________________________________________
                                                $24  SAVED $601

They turned out really great. I can't wait to wear them.  I just hope they hold up to a bit of wear and tear.  I may need to give them a few more coats of sealer. I'm sure I'll be wearing them in an outfit post soon. 


Pin It!

Friday, January 27, 2012

Frugal Fashion Friday - DIY: 1 Can of Paint 2 Projects

Today's edition of Frugal Fashion Friday focuses on my favorite instant change helper, spray paint!  I really believe it's the most versatile tool in your DIY arsenal.  A coat of paint, or two can completely change the look of an item. You've seen my transformations, home decor, shoes, and jewelry.  Today I thought I'd show you how I took one can of spray paint and created two fun DIY projects.

Project 1 - iPhone Cover

Project 2 - Chinese Lions
Using one can of Krylon Metallics spray paint in gold, PRESTO CHANGO and poof!  They are transformed. One of the projects was a great success. The other, not so much.  That's the chance you take with DIY.  Sometimes you have to go back to the drawing board and sometimes it's a loss.

Polka dots with pennies

A Little Issue
DIY projects don't always work out as planned.  Originally, I'd planned to take this iPhone case, tape it off and create stripes.  That didn't work.  The tape wouldn't stick to the cover. I guess that's because it's silicone. The coating kept the tape from sticking. I scrapped the idea of stripes and started thinking.  What could I use to create a pattern that would create a cool pattern but wouldn't have to stick to the case. PENNIES!  I laid pennies on top to create a polka dot pattern. I sprayed it with a clear sealant and let it dry over night.  Well, the plan still didn't work.  As soon as I picked up the case, the paint started to crack. You can see the cracks in the picture above. I ended up scrubbing off the paint and I'm going to try again.  I'll let you know how it goes. The case price was only $1. It came in a package of 10 different colored cases, that I purchased of Amazon for just $10.  I paid for this case and the clear case I purchased, with an gift card. Final cost, $0!

Project #2 was much more successful.  I bought the green Chinese Guardian Lions at Goodwill back in the fall.  They were a great find and I loved them but not the green color.  For $3 each, I knew I could make these lions shine.


Using thin coats of paint and letting them dry in between each coat. I love the result.

Project #1
Paint ($7) already owned and used on multiple projects
iPhone case ($1)    free with gift card
pennies for pattern      .06

______________________________
TOTAL COST:    6 cents! (maybe $1 worth of paint)


Project #2
Chinese Lions                    $6
Paint ($7) already owned and used on multiple projects
_______________________________
TOTAL COST:                  $6 (plus about $1 of paint)


Two projects for a total cost of $8.06.  I'm going to try again with the iPhone case. I'll keep you posted.


Happy Friday Real Girls!!


Pin It!
Related Posts Plugin for WordPress, Blogger...