Showing posts with label nail art. Show all posts

Monday, November 24, 2014

Upcoming Black Friday FUN! (with Jamberry Nails)

This is the start of beauty week here on RGR. To be honest, it happened accidentally. I have some great products and beauty tips to share with you, just in time for the Holidays! Usually I'm more of a Cyber Monday than a Black Friday girl. But when my friend and Jamberry Consultant, Noel Giger offered to let me host a fun and exciting party on Black Friday, I couldn't say no. I fell in love with Jamberry when Noel first introduced me to them. I did a review and I was hooked.


Noel promised me amazing things for this great online event. If you haven't tried Jamberry, now is your chance. One application lasts more than a week. They are easy to apply and look fantastic. If you're busy like me, love nail art but don't have the time or the money or are just looking for a low maintenance nail option, then Jamberry is for you. Click this link and RSVP for the party.

My Metallic Chrome Silver Jamberry nails!

I will be posting a little preview later this week, stay tuned!


Pin It!

Monday, July 22, 2013

White Polish - Plain or Art?

White nail polish is a hot trend right now. Frankly, I'm not sure if I like it or not. I'm planning a little mani tonight to try out the trend but I thought I'd get your input.  Do you like your white polish, plain, with art, or not at all? Here are some designs for thought.


White Polish - Plain or Art?
Click the photos abover for more details.

 
I thought I'd try plain first and then go for a few other options.  I'd love to add glitter, or a simple design or work using my trusty Sharpies. I coulsd also try out some fun designs using my new dotting tools or striping tape.

What do you think I should try first?


Pin It!

Tuesday, July 2, 2013

Blue and Gray with some 4th

This week we celebrate the 237th birthday of our country.  In the midst of all of the hot dogs, beer, potato salad, fireworks and fun, many times we forget what we are truly celebrating. The freedoms we enjoy in the United States were won by people who sacrificed so much and also by those who continue to sacrifice. This week also marks the 150th anniversary of the Battle of Gettysburg. The Civil War was a dark time in American history. I grew up in the south and my mom and lots of my family live very close to Appomattox, Virginia.  I was raised on Civil War stories. If the war had ended differently, we would not be living in the same country we live in today. We would likely not be living in the United States of America.  During this week, I will pause to think of those who built our country. Those who fought hard to give us all the life and freedom we enjoy today. Now enough of a history lesson and onto a little fashion in the form of a manicure.

essie Stroke of Brilliance, Maybelline Color Show Audacious Asphalt

I wore this version over the weekend and early in the work week.

Using my Martha Stewart glue pen, I drew two lines on my ring finger nails.

Then I sprinkled the nails with red glitter, cleaned up each nail and added a top coat.

The finished mani for my 4th of July fun.

If you've been following Real Girl Runway on Google Reader, you can keep following on bloglovin'.

Just click on this link and start following. http://www.bloglovin.com/blog/1672084/real-girl-runway


Pin It!

Tuesday, June 25, 2013

Sheer Pink and Gold Manicure

My DIY post last week was a little preview of my upcoming mani.  I've been dying to try striping tape. I found a striping tape and dotting tool bundle through Amazon and took the plunge.  It wasn't much of a risk since the entire kit cost less than $3.50, including shipping!  It arrived yesterday and I had to try it right away.


Laying down the striping tape was a little awkward and tricky.  I had to get {msL} to help me cut it to fit my nails.  Next time, I think I will use a flat blade cutting tool that will make it easier to cut the tape myself.  The first few nails took forever. Then I got the hang of it.

My base coat is essie Mademoiselle. It's a very pale, sheer, pink.  It was the perfect base for my gold french manicure.  I wanted simple and pretty.  After the base coat dried, I cut a small strip of tape and applied it to my nail, then trimmed it to size.  I did this for each nail.  After pressing the tape down to make sure the seal was tight, I applied two coats of top coat.


There will be other striping tape manicures coming.  I have lots of ideas and colors.


Pin It!

Wednesday, June 19, 2013

DIY - Upcoming Plans

Now that I'm not immersed in wedding planning, I have time again for DIY projects. I'm so glad. I've missed them. The projects are my time to destress.  Plus, when I'm finished, I have a great item to wear, use or in this case, eat.


Fun DIY and Additions


1)  Blinged Out Headphones - My company just remodeled our offices and we now have an open floor plan.  I purchased these plain, white, headphones to lessen the noise and I'm planning to decorate them with flat back rhinestones.

2) Homemade Thin Mints - I found this recipe for homemade Thin Mints on Pinterest. They are {msL's} favorites and you only need two ingredients!

3) Nail Art - I snagged this kit that contains dotting tools and striping tape for less than $5.  I can't wait to try out some new nail designs. Like this one.

4) Glitter Nails - I want to try out this manicure with nude polish and essie luxeffects in Stroke of Brilliance. I think the nude and blue combination will be fantastic.

5) iPhone Case - Even though this case is fancy, it lends itself to so many things. I'm planning to cut pieces of paper or wallpaper to place behind the filigree cover.  It will jazz up the amazing cover even more.

Do you have any plans for upcoming DIY projects?


Pin It!

Tuesday, May 21, 2013

Racing Stripe Manicure - Using a Sharpie

A few months ago I discovered a fun new way to add art to my nails...metallic Sharpies! I've done a few different manicures using my metallic Sharpies. I just pick a solid base, I prefer creamy colors, instead of frosted colors but I am going to try lots of options.


I chose L'Oreal Paris, Not a Cloud In the Sky as my base. The pretty aqua color is perfect for spring. Then I grabbed my silver Sharpie. I also have a gold and a bronze version.  The gold would have been great too. I snagged my Sharpies at Target in a 3 pack, one with each color.


The reason I love using a Sharpie instead of polish to create art, is the F#@! factor.  If you screw up and say F#@!, all you need to do is wipe your nail with alcohol and start over. You don't have to repaint your base color!

I decided to only do one nail this time.  I wanted racing stripes and I had a few extra cups of coffee, so my hands weren't as steady as they should be.  Two tiny stripes on my ring finger completed the look. I added top coat and I was finished.


As you can see the ridge in my nail, creates a bit of a wave but I still like the effect.  I've also done bronze hearts on a nude nail and gold dots on navy nails. The possibilities are endless. 


Pin It!

Thursday, March 21, 2013

I'm Obsessed Thank You Very Much - Navy Nails

Even though spring is trying to come around (not working so well in DC, it's 25 degrees tonight). I can't help but keep thinking about navy nail polish. I'm not sure why I'm stuck on it except that it's a prettier cousin to a standard black mani. Besides, navy goes with almost everything.  I stripped off my sad, chipping polish and my nails are bare right now.  Hopefully I'll have time for a manicure, in the next day or two. Navy is on the bill. I'm sure I won't be satisfied with just plain navy polish.


RGR - Navy Nails
Click photos for sources.


Navy polish isn't very forgiving, so precision is key.  The blogger ladies and the photos on Pinterest make it look easy. There are tricks of the trade.  My all time favorite nail polish/manicure guru, Jennifer of Fab Fatale posted this great tutorial last year.  Be sure to check it out and while you're at it, check out her blog.


Check out my other "I'm Obsessed" posts here, including the very first post and the explanation of the title.


Pin It!

Tuesday, January 8, 2013

MonoChrome Polka Dot Mani

I can't resist doing Google searches for fun new manicure ideas and new manis are always popping up on my Pinterest feed. I've seen lots of polka dot manis lately and wanted to try out doing one with my silver Sally Hansen Nail Art Pen.  I bought this pen a while ago and frankly, I haven't used it very much. What did I have to lose? If it looked terrible there is always polish remover nearby.  A subtle design was needed, since I have to work with clients this week (government clients).  I decided to go for a  monochromatic look with gray and silver.


 I started with Revlon Colorstay basecoat.  Then added three coats of Maybelline Color Show in Audacious Asphalt.  After that dried I drew in the polka dots with the Sally Hansen pen.  My left hand definitely looks better than my right.  But the right is pretty good.  I'm sure I could get the same look with nail stamping but I don't have a great polka dot stamp. Then I finished with two coats of top coat.

Natural Light

Office Light

It turned out great and I love the monochromatic look.  It's fun but subtle. More colors are definitely in order.


Pin It!

Tuesday, September 18, 2012

Jamberry Nail Shields Giveaway - And the Winner is...

CONGRATULATIONS to Sarai M!!  Sarai is the winner of the Jamberry Nail Shield sheet of her choice.


Thanks to everyone who entered and thank you for reading.  There is another giveaway coming soon. RGR has hit a few milestones.  We now have over 100 likes on facebook and over 500 followers on Twitter!  Those two milestones demand a celebration and a fantastic new giveaway is coming soon!

I also thought I'd give an update on my own Jamberry experience.  As you know I was a bit hesitant at first but I have to say, Jamberry has surpassed my expectations.  I get compliments on my nails everywhere I go and today is day 10.  They still look good.  There is a tiny (very tiny) bit of wear on the tips.  {msL} says that it's not noticeable at all and that they still look great.  One of the shields (ring finger on my right hand) has detached from the nail.  I noticed that after a few days and applied heat to reattach.  Now that I'm on day ten it has gotten worse. I think that is due to my error in application since none of the other shields have had this problem.  As the instructions stated, I had a few corners of the shields begin to peel up slightly.  I trimmed them with nail clippers instead of using glue as was suggested.  They still look great.


You can also see the nail growth.  I think that is the most noticeable issue. Your results will vary depending on how fast your nails grow. Despite the time it took to complete my original manicure, I'm a new Jamberry fan.  There are many more Jamberry manicures and pedicures in my future. 10 days and no chips! I'm on board! If you'd like your own set of Jamberry Nail Shields, be sure to visit Noel's website.  You can see all of the Jamberry styles and get tips on application.  She is running a special right now, buy 3 get 1 free.  Based on my own experience, you'll get at least 16 manicures or pedicures for $45 (only $2.81 each), from the deal!  That's a bargain for a manicure that will last you for more than one week. 


Pin It!

Monday, September 10, 2012

Jamberry Nails - My Review (and Giveaway!)

Last year I started seeing nails adorned with nail strips everywhere.  I fell in love with a set of mirrored silver nails that I later found out could only be done in a salon.  The cost was more than I wanted to spend and I started looking for a less expensive alternative.  I couldn't find anything close, until now.  I was contacted by Noel Giger, a Jamberry Independent Star Consultant.  Noel offered to send me a set of Jamberry Nail Shields.  I was thrilled to find out that Jamberry had the coveted silver mirrored nails I had been dying for!  This is a photo and video heavy post. Click below to check out the full post and enter the giveaway!


Pin It!

Wednesday, August 29, 2012

Nail Stamping - My Try

For a long time I've been looking at photos and blogs that feature nail stamping. I've wanted to try the technique but what if it's not for me?  The thought of spending a ton on tools that I didn't use wasn't appealing.  Amazon sells bundles of plates and kits from a company called Konad.  They are the premier nails stamping company.  The least expensive kits sell for around $13.  Then I saw a Salon Express kit at CVS and it was only $9.99.  

My First Attempt

The kit came with 5 plates, a plate holder, a double ended stamper and a scraper. The directions in the kit weren't great. Enter my fellow bloggers.  I did a search for nail stamping tutorials.  I found lots of great tips on blogs like Nouveau Cheap, Nailcicles, and Swatch and Learn.  Because of their tutorials and tips, I didn't have as many errors as I thought I might. I followed their suggestions for tools and set up and lots of other tips.


My impatience got the best of me. I was so excited to open the kit that I didn't think to get a photo before I opened it and pulled everything out.  This is the package and as I mentioned, I got it at CVS.  The list price was $9.99. The beauty of CVS is that I could use Extra Care Bucks for this purchase and I only paid $1.99 for it!

To stamp I also needed polish remover, a nail file, cotton pads, paper towels, a old gift card and something to use as a table cover (newspaper).  I also should have used some plain white paper to test stamp.  I didn't do that but I will in the future.


I didn't love the whole nail plates that came in the kit.  Also, I think that I need more practice and better color combinations to make them look great.  The fan design I tried first looked okay but I didn't love it enough to do every nail.  The designs I like best a small and allow lots of the base color to show through. I've heard that the kits sold at Sally Beauty and Rite Aid come with different plates.  I might get one of those.

The nail polish you use is a key factor.  It doesn't have to be expensive or a specific type but it needs to be thicker that most polishes. Trying them out is important.  That's where the paper comes in handy. 


Base color - Sally Hansen Hidden Treasure and Heart - Essie in Foot Loose


I decided to just do one accent nail instead of my whole hand. I like the single heart. It's pretty.

Best Tips from Bloggers
  • Set up your area and supplies before you start stamping. 
  • Paint your base color and then a clear top coat.  If you make a mistake you can clean off your nail with a quick swipe and you won't mess up your base color. 
  • Buff your stamper with a fine grained nail file before you stamp. Just a few strokes.  It will help the polish adhere better.
  • Use nail polish that is thick.  You can use special stamping polish, older polish or polish with a thicker consistency.
  • Use a plastic scraper or an old credit or gift card.  It will keep you from scratching your image plate and give you a cleaner swipe.Which leads to a cleaner stamp on your nail. Test out the pressure you use. This will take practice.
  • When pulling the design from the plate, stamp straight down onto the plate and use firm pressure.
  • When stamping onto your nail, use a rolling motion to transfer the design.
  • Let your design(s) dry for a while before painting a top coat.
  • Only do one stroke of top coat over each design area.  This will create a shield but will help keep the design from smearing.
  • After the first layer of top coat dries, you can add another. 
The results were good and I'd like to try other designs.  I will definitely be doing more stamping in the future.  I'll be trying other color combos and getting some other plates.

Have you tried nail stamping before?  If you haven't, will you?


Pin It!

Wednesday, July 25, 2012

Inspiration - This Week's Pinspiration

You all know my love of Pinterest. It's been a great tool for wedding planning and I collect everything from style ideas to recipes on the site. For years I've torn pages out of magazines and shoved them in a folder. The favorites link on my Internet browser could use its own Dewey Decimal system. I save ideas, sites, thoughts and everything that inspires me. Pinterest is a dream come true. I thought I'd share with you, some of my latest inspiration.


Five fashion editors wore the same rock t-shirt, five different ways. I love the way it shows individual style but you all know I love mixing rock t-shirts all sorts of ways.


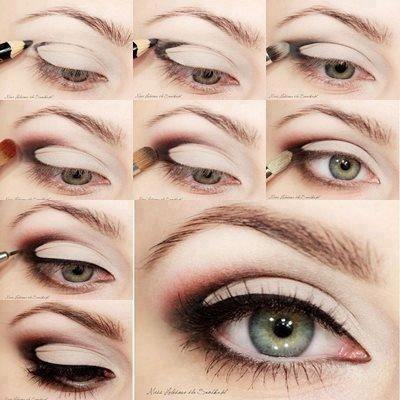
Great tip on accenting your eyes.  I love the step by step that you could use with any eye color and liner.


Cherry lime popsicles made fresh from real fruit.  These scream summer to me. I definitely need to make them pronto!


Four easy braided hairstyles.  With this crazy hot weather and my struggle to keep from cutting my hair off, I've been loving braids lately.


What's not to love about an ombre glitter manicure?  It's already on my list of, must try, manis this summer. The color options are endless.


This outfit is simple, fun and a great way to try neon without looking like an 80's flashback. Did I mention that I used to own a neon ski jacket?  Mixing neon with neutrals is a perfect way to try the trend.


This saying spoke to me as soon as I saw it.  I've been in relationships and had supposed friends who dulled my sparkle but not anymore.  Growing as a person has taught me to never let anyone dull my sparkle.

Do you have a Pinterest account?  If you don't, be sure to request an account. It's fun and a great way to collect your ideas.  Once you have an account don't forget to show me some love and follow me.  I'm in the process of  following all of you lovely folks who are following me.


Pin It!

Tuesday, June 26, 2012

Nail Art for the Time Crunched and Polish Challenged

There are lots of ladies out there who don't have time or the inclination to do nail art (including me, many days).  I have to admit that crystal and flower laden nails aren't for me. When I refer to nail art, I mean an interesting pattern or a little glitter.  There are products out there that can give you a nail art look easily.

Nail Polish Strips
Lots of companies are making nail polish strips but my personal favorite are by Sally Hansen.  They are easily found at your local drugstore, they come in tons of colors and patterns and they're affordable.  I've occasionally found coupons for them as well.  The bonus is that they last for about 7 days or more.


Incoco, Sephora, and Kiss also make strips. I've tried Incoco and Sephora.  In fact Incoco were the first strips I tried.  The Sephora strips are more like stickers. There were think and I didn't like them as much as the Incoco and Sally Hansen versions.

Magnetic Polish
One of the latest nail polish trends is magnetic polish.  The polish has metal particles in it. While the polish is wet, you hold the magnet cap over the polish and it creates a design.  The magnets with each brand have a different pattern (star, wave, stripes).  This post by Scrangie has details and shows the designs you can get with the China Glaze magnet.  The Sally Hansen version has a wave design.  The difference is the way you paint your nails.  You'll put a light base coat on you nails.  Then you'll need to paint a single nail and hold the magnet over the wet nail (without touching it). Then move onto the next nail.  The Sally Hansen version dried quickly.

Sally Hansen Magnetic Nail Color in Silver Elements
Glitter Polish
With a single swipe of glitter polish, you can turn a basic nail color into a fun, artsy manicure.  Almost every brand has glitter polish. I always go for the budget brands like Wet 'n Wild. They have lots of options and the polish costs 99 cents to $1.99 per bottle.

Spoiled by Wet n' Wild - Jewelry Heist over Show Me Some Skin
These are my quick ways to get a better than basic manicure without spending tons of time.  Do you have any quick manicure tricks?

Have a great Tuesday!


Pin It!

Monday, April 2, 2012

Dripping Dots Mani

I've gotten so many great manicure ideas from Pinterest that I don't know if  I'll ever be able to try them all.  Recently I pinned a great tip from The Beauty Department. To make polka dots on your mani just push a flat head pin into a pencil eraser and dip it into the polish you want to dot. It makes a perfect dot tool.


My love of Revlon ColorStay Longwear nail enamel continues. For this mani I used Sequin as the base and Stiletto for the dripping dots. I painted two base coats of Sequin. I dripped a small amount of Stiletto onto a disposable plate. Then I dipped the pin head in and created a dotted line across the tip of each nail and added random dots dripping down each nail. I found that bending the pin gave me more control of the dotting tool.


They turned out better than I'd hoped. The sparkly sequin base is a perfect backdrop for the black dots. Using the pin dotting tool was surprisingly easy. The best tip I have is to dip lightly. You only need a small amount of polish on the pin head to create a dot. Too much makes a glob. It also helps to clean off the pin head occasionally with some polish remover. You can use any color combo to make fun polka dot nails. If you try it with different colors, I'd love to see your mani.  Please post it to the Real Girl Runway facebook page.


Pin It!

Monday, March 19, 2012

This Mani is Just Peachy!

The other day I went to CVS to get a few things. The first thing I do when I walk into CVS is to scan my Care Card at the kiosk. I do this because many times I get a discount I can use on my purchase that day. Sometimes I get ECBs and other times I get a discount coupon on certain products.  When I scanned my card that day, I got a coupon for a free bottle of Essie nail polish! With my coupon I purchased a bottle from their spring collection, a pastel peach called, A Crewed Interest. It's such a pretty color and since I usually go for dark colors, metallics. or brights, I thought I'd grab something different.

Martha Stewart glitter in Coral, essie polish in A Crewed Intereset and my arsenal of fashion magazines to read while my mani is drying

I've been dying to use some of my Martha Stewart glitter in a mani. The color choices are amazing. I chose the coral shade as a darker compliment to the peach polish. 


Pin It!

Saturday, February 25, 2012

Mani for a Saturday Morning

I've been inspired by the glitter tipped manis I've been spying on blogs and Pinterest lately. I decided I needed my own version. I love nude nails and silver glitter so I thought combining the two would be amazing.

I used Revlon ColorStay Longwear nail enamel in Bones, Ulta in Starstruck and Nicole by OPI in Make You Smile.


Pin It!
Related Posts Plugin for WordPress, Blogger...